The Gist

Looking to set up a web server, dear reader? Well, you’ve come to the right place.
We suggest we do so using Podman rootless containers, and set it up automatically using cloud-init.
We’ll explain those as we go along, dear reader, if you’re not already aware of these wonderful tools. The long and short of it is, that these tools will quite literally allow us to preconfigure an entire server.
So let’s put the kettle on, draw some tea, and get this set up shall we?
Note
What you will learn in this tutorial:
- Cloud-Init
- Rootless Podman
- NGINX configuration
- Vultr API
NOTE 1: This tutorial presents a ready-to-use solution, and observes best practices for security wherever possible. It is however intended for more experienced readers, for those starting out there are easier and lower risk options available. We will discuss that very soon, in an upcoming tutorial.
NOTE 2: We updated this tutorial a bit, dear reader, by tightening security somewhat and adding an example file for a site serving pages over HTTPS.
Contents
The Plan
We’ll be using Vultr for this tutorial, one of our favourite cloud providers, along with Digital Ocean, and Linode. We’ll spread the love among these three in our tutorials and guides, until one of them decides to sponsor us, or advertise with us.
Hmm, what? Ahem, Moving on.
We’ll describe how to set up our secure access (SSH) key and adding it to our Vultr account first. After that we’ll discuss and configure our automation script, paste it into our server deployment, and test it out.
The result should not only be a working server, but a reusable set of techniques that we can use for other servers as well.
Before we start, however, we’ll assume that you have access to either a Linux machine, a Mac, or the “Windows Subsystem for Linux” system, dear reader.
We’ve prepared several files for you to download and guarantee a successful completion of the project. The first is a little shell script we wrote to interact with Vultr’s API. You could do everything manually, of course, but this saves time. The second is a configuration file to accompany the script. The third is a YAML file that holds all the automation specifics and configures our server exactly the way we want it.
We understand that downloading scripts may be a little unnerving, dear reader, so we’ll discuss the contents next.
Code
#!/bin/bash

# Make sure the VULTR_API_KEY variable is set.
if [[ -z $VULTR_API_KEY ]]; then
    echo "VULTR_API_KEY environment variable not set. Exiting."
    exit 0
fi

# Make sure the jq binary is available.
if [[ ! -f /usr/bin/jq ]]; then
    echo "This script requires jq to be installed. Exiting."
    exit 0
fi

# Establish the script name for the usage section
BIN=$(basename $0)

# Helper function to encode a file to Base64, as required by the Vultr API.
ENCODE() {
USER_DATA_BASE64=$(base64 -w 0 < $1)
if [ -z "$USER_DATA_BASE64" ]; then
  echo "Error: Failed to encode $1 or file is empty."
  exit 1
fi
}

# Helper function to prepare the JSON payload for the deploy instance request.
INSTANCE_PAYLOAD() {
read -r -d '' INSTANCE_PAYLOAD << EOM
{
  "region": "${REGION_ID}",
  "plan": "${PLAN_ID}",
  "os_id": ${OS_ID},
  "label": "${SERVER_LABEL}",
  "hostname": "${SERVER_HOSTNAME}",
  "backups": "enabled",
  "enable_ipv6": true,
  "user_data": "${USER_DATA_BASE64}",
  "sshkey_id": ${SSH_KEY_IDS}
}
EOM
}

# Helper function to prepare the JSON payload for the SSH key registration request.
SSH_PAYLOAD() {
read -r -d '' SSH_PAYLOAD << EOM
{
  "name": "${1}",
  "ssh_key": "$(cat ${2})"
}
EOM
echo $SSH_PAYLOAD | jq
}

# The instance create request
INSTANCE_REQUEST() {
curl -X POST "https://api.vultr.com/v2/instances" \
  -H "Authorization: Bearer ${VULTR_API_KEY}" \
  -H "Content-Type: application/json" \
  --data "${INSTANCE_PAYLOAD}" | jq
}

# The register SSH key request
SSH_REQUEST() {
curl -X POST "https://api.vultr.com/v2/ssh-keys" \
  -H "Authorization: Bearer ${VULTR_API_KEY}" \
  -H "Content-Type: application/json" \
  --data "${SSH_PAYLOAD}" | jq
}

# Helper function for general information requests
INFO_REQUEST() {
curl -X GET "https://api.vultr.com/v2/${1}" \
    -H "Authorization: Bearer ${VULTR_API_KEY}" | jq
}

# Little "menu" system
case "$1" in
    regions)
        INFO_REQUEST regions
        ;;
    plans)
        INFO_REQUEST plans
        ;;
    os)
        INFO_REQUEST os
        ;;
    ssh)
        case "$2" in
            get)
                INFO_REQUEST ssh-keys
            ;;
            create)
                if [[ -n "$3" && -n "$4" ]]; then
                    SSH_PAYLOAD $3 $4
                    SSH_REQUEST
                else
                    echo "Usage $BIN $1 $2 {name} {ssh key}"
                    exit 0
                fi
            ;;
            *)
                echo "Usage $BIN $1 {get|create} {name} {ssh key}"
                exit 0
            ;;
        esac
    ;;
    deploy)
        if [[ -n "$2" && -n "$3" ]]; then
            if [ -f "$2" ] && [ -f "$3" ]; then
                source $2
                ENCODE $3
                INSTANCE_PAYLOAD
                INSTANCE_REQUEST
            fi
        else
            echo "Usage: $BIN $1 {configuration file} {userdata file}"
            exit 0
        fi
        ;;
    instances)
        INFO_REQUEST instances
        ;;
    *)
        echo "Usage: $BIN regions | plans | os | ssh | deploy | instances"
        ;;
esac
The contents of the accompanying configuration file:
Code
REGION_ID="lhr"
PLAN_ID="vc2-1c-1gb"
OS_ID="1868"
SERVER_LABEL="biscuits"
SERVER_HOSTNAME="biscuits"
SSH_KEY_IDS='["VULTR_SSH_KEY"]'
The reason we made this into a separate file is for your convenience. This way you may copy and change it for future server deployments.
Setting up Secure Access (SSH)
Before we do anything, we need to make sure we have a public SSH key that we can use to access our server securely after it has been set up. We don’t want to use passwords. As our great-great-great ancestor likely would have put it: ‘Passwords bad, keys good’. Well, at least were digital things are concerned, dear reader. We’re not touching any other implications with a 10 yard prodding device.
Let’s open up a terminal, (best to keep it open for the entirety of the session) and copy-paste the following:
Code
export SSH_KEY_NAME=REPLACEME

ssh-keygen -q -t rsa -N '' -f ~/.ssh/${SSH_KEY_NAME}
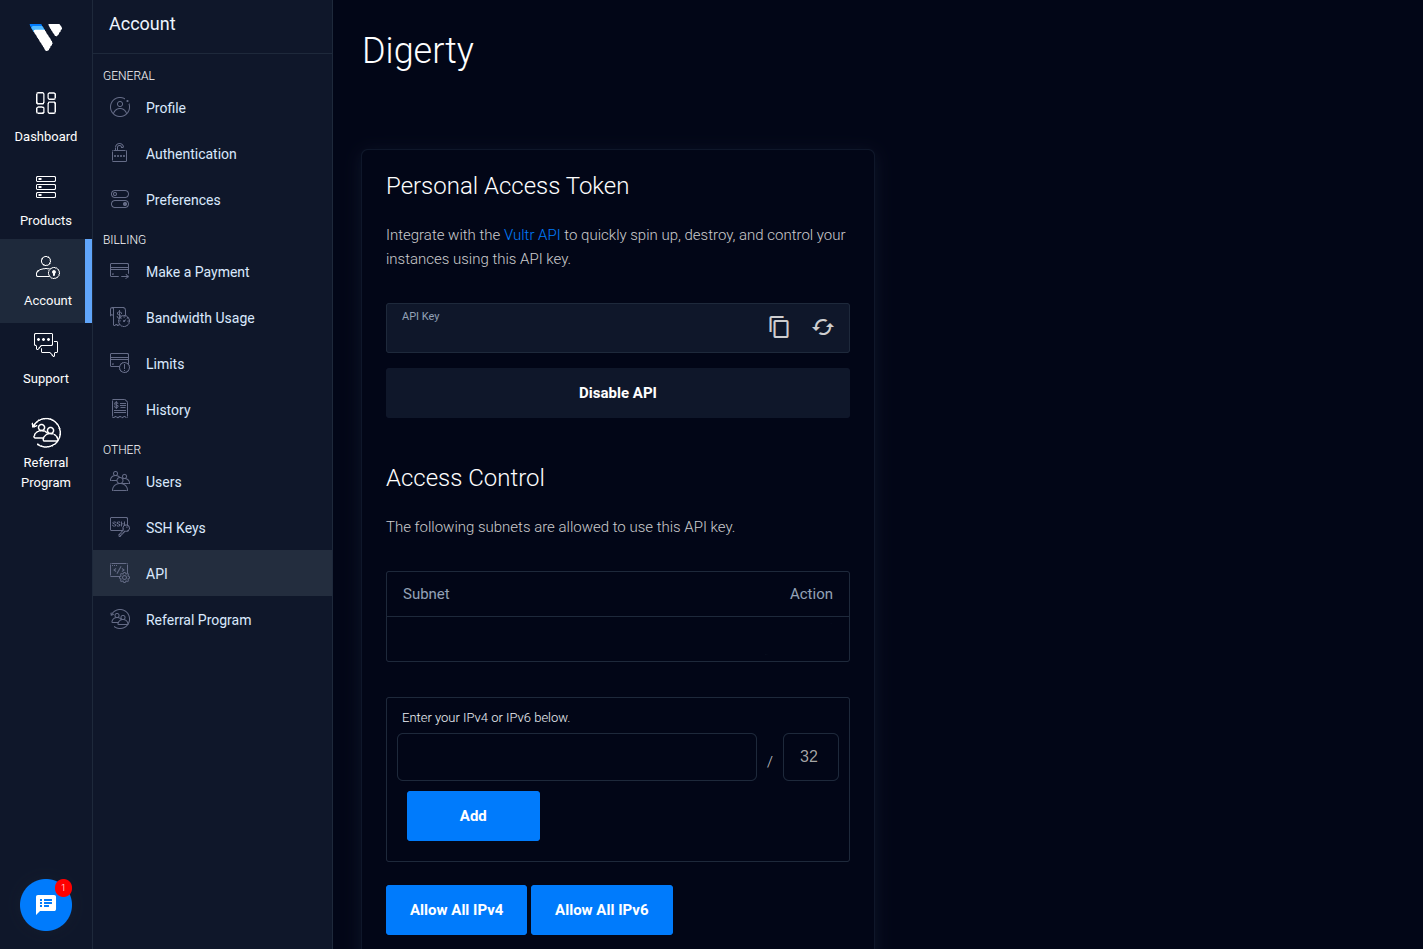
Next, we’ll need to visit the API Settings Page of Vultr. We will need to get our public IP address and add it to the access control list, followed by adding 32 to signify a single address. We had to remove our API key from the image for obvious reasons, but there will be a fresh one there when you visit, dear reader.
With that out of the way we can prepare our working environment by exporting our API key and adding the SSH key to our Vultr account:
Code
export VULTR_API_KEY=MY_ACTUAL_API_KEY

# This is where our 'vultrtl.sh' script comes in handy:

./vultrtl.sh ssh create ${SSH_KEY_NAME} ~/.ssh/${SSH_KEY_NAME}.pub
This will return something along the lines of:
Code
{
  "ssh_key": {
    "id": "REDACTED",
    "date_created": "2025-04-24T16:08:20+00:00",
    "name": "super",
    "ssh_key": "ssh-rsa REDACTED [email protected]"
  }
}
We need to copy the value of the id key in the response and replace “VULTR_SSH_KEY” value in our biscuits.conf file next. We’ll assume you know how to do that, dear reader, so we’re not getting into that right now.
Setting up Automation
Now we get to the nitty-gritty, dear reader, but we do have a choice to offer. You can skip to the section that discusses deploying the server, and all will be well. Just a little less educational. Or you can read this section, and learn the what, why, when, and where. The choice is yours, dear reader.
The Basics
If you had a look, dear reader, it is indeed quite a long file. Let’s discuss it bit by bit, and see what makes it tick. For the record, however, this part has nothing to do with Vultr specifically. It is all about cloud-init, podman, nginx, and other tidbits. If we’d chosen any other provider, it would have been based on the same file. Well, for this style of deployment at least.
The cloud-init tool allows us to use various methods to automate server deployment. Originally created by Canonical (the company behind Ubuntu Linux). It has proven so very useful that it is now supported by almost every Linux distribution, and cloud service provider.
We’ll be using the methods available to pre-configure users, create configuration files, and run custom commands to configure our web server for this tutorial.
! Important !
We don’t recommend assembling the file by copy-pasting each section, dear reader. It would be better to download the file, and edit it as necessary. For both testing, and customisation. The segments—as presented—are for educational purposes.A cloud-init file is often referred to as ‘user data’ by cloud providers. It starts with a simple line:
Code
#cloud-config
Creating Users
We then invoke the users module, which allows us to create the user accounts we are going to need. The reason we start with this, is because we need to guarantee those accounts are known to the system, as we attempt to apply ownership conditions to various files.
We’d normally start by invoking the upgrade packages module, but found this to cause smaller servers to run out of memory. We therefore do this manually later on in the ‘running commands’ section.
Code
users:
  # Create webmaster account
  - default
  - name: webmin
    gecos: "Website Administrator"
    shell: /bin/bash
    homedir: /home/webmin
    lock_passwd: true
    sudo: ['ALL=(ALL) NOPASSWD:ALL']
  # Create a rootless container user
  - name: web
    system: true
    shell: /bin/false
    homedir: /data/web
Creating Files
We then invoke the ‘write_files’ module with a simple line:
Code
write_files:
We’ll be creating all of the files we are going to need for this project using this module, such as our firewall rules script, our web server configuration, a dummy HTML file, and our systemd service files which ensure that our rootless podman containers will be started automatically.
Our Firewall:
We won’t go into too much detail on our choice of firewall, save mentioning our reasons and the basics. This tutorial would be far too long if we went into that kind of detail, and we will publish a guide on firewalls in the not too distant future.
The gist of it is allowing outgoing traffic by default, and disallowing forwarding and incoming traffic by default. We limit the rate at which we can be pinged, and disallow typical hacker tricks. We then carefully allow the kind of incoming traffic that our server is intended for. For IPv4 and IPv6 simultaneously wherever possible.
As to why we go for the manual approach: we prefer the manual approach. Manual study, keeping up to date with typical threats, and knowing exactly what is happening on our servers.
Code
  - content: |
      #!/usr/sbin/nft -f

      flush ruleset

      define WAN = enp1s0

      table inet global {
          chain inbound_public {
              # Basic DoS protection
              tcp flags syn limit rate 100/second burst 150 packets accept

              # ICMP/ICMPv6 rate limiting & essential types
              icmp type echo-request limit rate 5/second accept
              icmpv6 type echo-request limit rate 5/second accept
              icmpv6 type {
                  nd-neighbor-solicit,
                  nd-neighbor-advert,
                  nd-router-advert,
                  nd-router-solicit,
                  parameter-problem,
                  packet-too-big
              } accept

              # ICMPv4
              icmp type { destination-unreachable, time-exceeded, parameter-problem } accept

              tcp dport { 80, 443 } accept
              tcp dport 22222 accept
              tcp dport 22223 accept
          }

          chain inbound {
              type filter hook input priority filter; policy drop;

              # Connection tracking - Allow established/related, drop invalid
              ct state vmap { established : accept, related : accept, invalid : drop }

              # Anti-spoofing rules: IPv4
              iifname $WAN ip saddr {
                  127.0.0.0/8,     # Localhost
                  0.0.0.0/8,       # Invalid source
                  10.0.0.0/8,      # RFC1918
                  172.16.0.0/12,   # RFC1918
                  192.168.0.0/16,  # RFC1918
                  169.254.0.0/16,  # Link Local
                  224.0.0.0/4      # Multicast
              } drop

              # Anti-spoofing rules: IPv6
              iifname $WAN ip6 saddr {
                  ::1/128,         # Localhost
                  fe80::/10,       # Link Local
                  ff00::/8,        # Multicast
                  fd00::/8         # ULA
              } drop

              # Drop invalid TCP flags
              tcp flags & (fin|syn) == (fin|syn) drop
              tcp flags & (syn|rst) == (syn|rst) drop
              tcp flags & (fin|syn|rst|psh|ack|urg) == 0 drop
              tcp flags & (fin|syn|rst|psh|ack|urg) < (syn) drop
              tcp flags syn tcp option maxseg size <= 48 drop

              # Drop IPv4 broadcast explicitly
              iifname $WAN ip daddr 255.255.255.255 counter drop

              # Allow all traffic on loopback interface
              iifname lo accept

              # Jump to public chain for WAN interface traffic
              iifname $WAN jump inbound_public

              # Log and drop anything else that reaches here
              log prefix "[nftables] Inbound Denied: " counter drop
          }

          chain outbound {
              type filter hook output priority filter; policy accept;
          }

          # No need to forward anything, this is a web server
          chain forward {
              type filter hook forward priority filter; policy drop;
          }
      }
    path: /etc/nftables/main.nft
    permissions: '0600'
    owner: root:root
Our ‘rootless’ Configuration:
We want our rootless containers to offer services on the usual ports. To achieve this we configure the system to lower the starting point for unprivileged ports from the usual 1024, to 80 instead.
Code
  - content: |
      net.ipv4.ip_unprivileged_port_start=80
    path: /etc/sysctl.d/99-rootless-ports.conf
    permissions: '0600'
    owner: root:root
Our HTTP Server:
We want our server to be able to display a test page right away, so we create the necessary server configuration file, the default site configuration file, a dummy HTML file, and the server systemd service file. Note that we are making root:root the initial owner, as we’ve noticed some issues with setting the permissions to the user we created earlier using this method. We’ll change ownership of these files a little later on.
Code
  - content: |
      user root;
      worker_processes auto;

      pid /run/nginx.pid;

      events {
        worker_connections 1024;
        multi_accept on;
      }

      http {
        include /etc/nginx/mime.types;
        default_type application/octet-stream;

        log_format main '$remote_addr - $remote_user [$time_local] "$request" '
                    '$status $body_bytes_sent "$http_referer" '
                    '"$http_user_agent" "$http_x_forwarded_for"';

        access_log /dev/stdout main;
        error_log /dev/stderr warn;

        sendfile on;
        tcp_nopush on;
        tcp_nodelay on;

        keepalive_timeout 65;
        #keepalive_requests 100;

        types_hash_max_size 2048;

        server_tokens off;

        client_max_body_size 50M;
        client_body_buffer_size 128K;

        ssl_protocols TLSv1.2 TLSv1.3;
        ssl_prefer_server_ciphers on;
        ssl_ciphers ECDHE-ECDSA-AES128-GCM-SHA256:ECDHE-RSA-AES128-GCM-SHA256:ECDHE-ECDSA-AES256-GCM-SHA384:ECDHE-RSA-AES256-GCM-SHA384:ECDHE-ECDSA-CHACHA20-POLY1305:ECDHE-RSA-CHACHA20-POLY1305:DHE-RSA-AES128-GCM-SHA256:DHE-RSA-AES256-GCM-SHA384;
        ssl_session_cache shared:SSL:10m;
        ssl_session_timeout 1d;
        ssl_session_tickets off;

        ssl_dhparam /etc/nginx/dhparam.pem;

        gzip on;
        gzip_disable "msie6";
        gzip_vary on;
        gzip_proxied any;
        gzip_comp_level 6;
        gzip_buffers 16 8k;
        gzip_http_version 1.1;
        gzip_types
          application/atom+xml application/javascript application/json application/ld+json
          application/manifest+json application/rss+xml application/vnd.geo+json
          application/vnd.ms-fontobject application/x-font-ttf application/x-web-app-manifest+json
          application/xhtml+xml application/xml font/opentype image/bmp image/svg+xml
          image/x-icon text/cache-manifest text/css text/plain text/vcard
          text/vnd.rim.location.xloc text/vtt text/x-component text/x-cross-domain-policy;

        open_file_cache max=1000 inactive=20s;
        open_file_cache_valid 30s;
        open_file_cache_min_uses 2;
        open_file_cache_errors on;

        include /etc/nginx/conf.d/*;
      }
    path: /data/web/nginx/conf/nginx.conf
    permissions: '0644'
    owner: root:root
  - content: |
      server {
        listen 80 default_server;
        listen [::]:80 default_server;

        root /var/www/default;
        index index.html index.htm;

        server_name _;

        location / {
                try_files $uri $uri/ =404;
        }
      }
    path: /data/web/nginx/conf/conf.d/default
    permissions: '0644'
    owner: root:root
  - content: |
      <!DOCTYPE html>
      <html>
      <head>
      <title>Service Up and Running.</title>
      <style>
        body {
          width: 35em;
          margin: 0 auto;
          font-family: Tahoma, Verdana, Arial, sans-serif;
        }
      </style>
      </head>
      <body>
      <h1>Service Up and Running.</h1>
      </body>
      </html>
    path: /data/web/nginx/www/default/index.html
    permissions: '0644'
    owner: root:root
  - content: |
      [Unit]
      Description=Podman Nginx Container
      Wants=network-online.target
      After=network-online.target
      RequiresMountsFor=%h

      [Service]
      Environment=PODMAN_SYSTEMD_UNIT=%n
      Restart=on-failure
      TimeoutStopSec=70
      ExecStartPre=-/usr/bin/podman rm -f %N
      ExecStart=/usr/bin/podman run \
        --name %N \
        --replace \
        --rm \
        -p 80:80 \
        -p 443:443 \
        --volume %h/nginx/www:/var/www:ro,z \
        --volume %h/nginx/conf/nginx.conf:/etc/nginx/nginx.conf:ro,z \
        --volume %h/nginx/conf/dhparam.pem:/etc/nginx/dhparam.pem:ro,z \
        --volume %h/nginx/conf/conf.d:/etc/nginx/conf.d:ro,z \
        --volume %h/acme/etc:/etc/letsencrypt:ro,z \
        --volume %h/acme/www:/var/www/certbot:ro,z \
        docker.io/library/nginx:stable-alpine

      # Use podman exec to reload config gracefully
      ExecReload=/usr/bin/podman exec %N nginx -s reload
      ExecStop=/usr/bin/podman stop -t 10 %N
      ExecStopPost=-/usr/bin/podman rm -f %N

      [Install]
      WantedBy=default.target
    path: /data/web/.config/systemd/user/nginx.service
    permissions: '0644'
    owner: root:root
Our Secure Access Server:
As we want to be able to use SFTP and Rsync to upload new files to our web server, we need to have access to SSH. We’ll be using the official Alpine Linux image for that, which will reinstall the necessary packages at every restart. To make sure that it persists the host SSH keys and the ‘authorized_keys’ we map two directories to the container.
Code
  - content: |
      [Unit]
      Description=Podman SSH Container
      Wants=network-online.target
      After=network-online.target
      RequiresMountsFor=%h

      [Service]
      Environment=PODMAN_SYSTEMD_UNIT=%n
      Restart=on-failure
      TimeoutStopSec=70
      ExecStartPre=-/usr/bin/podman rm -f %N
      ExecStart=/usr/bin/podman run \
        --name %N \
        --replace \
        --rm \
        -p 22223:22223 \
        --volume %h/ssh/etc:/etc/ssh:z \
        --volume %h/ssh/root:/root:z \
        --volume %h/nginx/www:/var/www:z \
        docker.io/library/alpine:latest \
          sh -c "apk add openssh rsync; (if [ ! -f /etc/ssh/ssh_host_rsa_key ]; then ssh-keygen -A; fi); /usr/sbin/sshd -D -e -p 22223"

      # Use podman exec to reload config gracefully
      ExecStop=/usr/bin/podman stop -t 10 %N
      ExecStopPost=-/usr/bin/podman rm -f %N

      [Install]
      WantedBy=default.target
    path: /data/web/.config/systemd/user/sshd.service
    permissions: '0644'
    owner: root:root
Our Certificates:
We want our web server to serve pages over HTTPS, of course, so we have to bring in Certbot to do that for us. We’ll set a timer for it to run twice a day, and update certificates as necessary.
Code
  - content: |
      [Unit]
      Description=Renew Let's Encrypt certificates (Certbot)

      [Timer]
      OnCalendar=daily
      RandomizedDelaySec=12h
      Persistent=true

      [Install]
      WantedBy=timers.target
    path: /data/web/.config/systemd/user/certbot-renew.timer
    permissions: '0644'
    owner: root:root
  - content: |
      [Unit]
      Description=Renew Let's Encrypt certificates (Certbot)

      [Service]
      Type=oneshot
      ExecStart=/usr/bin/podman run \
        --rm \
        --name certbot-renew \
        --volume %h/acme/etc:/etc/letsencrypt:z \
        --volume %h/acme/lib:/var/lib/letsencrypt:z \
        --volume %h/acme/www:/var/www/certbot:z \
        docker.io/certbot/certbot:latest \
          renew \
          --webroot -w /var/www/certbot \
          --quiet

      ExecStartPost=/usr/bin/systemctl --user reload nginx.service
    path: /data/web/.config/systemd/user/certbot-renew.service
    permissions: '0644'
    owner: root:root
Running Commands
With all of the requisite files created, it is now time to start running the commands, and there’s quite a few of them. We’ve commented this section quite heavily, so you may understand our reasoning.
Code
runcmd:
  - |
    # Install packages here because it runs out of memory if using the packages module
    # On servers with less than 2GB RAM that is.
    dnf -y update
    dnf -y install podman passt curl wget git nftables policycoreutils-python-utils

    # Configure SSH port, disable root login, disable password login
    # Delete the root login line that Vultr adds
    sed -i '/^PermitRootLogin yes$/d' /etc/ssh/sshd_config
    # Change port to the one we specified in our firewall
    sed -i 's/#Port\ 22/Port\ 22222/g' /etc/ssh/sshd_config
    # Explicitly disallow root login, just to be sure
    sed -i 's/#PermitRootLogin\ yes/PermitRootLogin\ no/g' /etc/ssh/sshd_config
    # Explicitly disallow password login
    sed -i 's/#PasswordAuthentication\ yes/PasswordAuthentication\ no/g' /etc/ssh/sshd_config
    # Update selinux to our new chosen port
    semanage port -a -t ssh_port_t -p tcp 22222
    # Restart the SSH server
    systemctl restart sshd

    # Configure nftables to use /etc/nftables/main.nft
    sed -i 's/#include/include/g' /etc/sysconfig/nftables.conf

    # Disable firewalld, enable nftables
    systemctl disable --now firewalld
    systemctl mask firewalld
    systemctl enable --now nftables

    # Update systemctl to make our changes active
    # Enable rootless container accounts to run services < 1024
    sysctl --system

    # Make sure that web:web owns everything;
    # Setting permissions with the users module didn't work in testing
    chown -R web:web /data/web

    # Prepare rootless container account
    export SERVICE="web"
    # Enable persistent systemd user settings
    loginctl enable-linger "${SERVICE}"
    # Create missing directories
    DIRS=("acme/etc" "acme/www" "acme/lib" "ssh/etc" "ssh/root")
    for DIR in ${DIRS[@]}; do su -s /bin/bash web -c "mkdir -p ~/${DIR}"; done
    # Set the correct selinux context
    semanage fcontext -a -t user_home_dir_t "/data/${SERVICE}(/.+)?"
    restorecon -Frv /data/"${SERVICE}"
    # Set the correct UID and GID ranges for rootless containers
    NEW_SUBUID=$(($(tail -1 /etc/subuid |awk -F ":" '{print $2}')+65536))
    NEW_SUBGID=$(($(tail -1 /etc/subgid |awk -F ":" '{print $2}')+65536))
    usermod --add-subuids ${NEW_SUBUID}-$((${NEW_SUBUID}+65535)) --add-subgids ${NEW_SUBGID}-$((${NEW_SUBGID}+65535)) "${SERVICE}"

    # Enable SSH access for webmin
    cp -r /root/.ssh /home/webmin
    chown -R webmin:webmin /home/webmin

    # Enable SSH access for rootless container account
    cp -r /root/.ssh /data/web/ssh/root
    chown -R web:web /data/web/ssh/root

    # Generate DH Params for web server
    su -s /bin/bash web -c 'openssl dhparam -out /data/web/nginx/conf/dhparam.pem 2048'
    su -s /bin/bash web -c 'chmod 600 /data/web/nginx/conf/dhparam.pem'

    # Make sure the correct XDG_RUNTIME_DIR is set when we su to the web account
    su -s /bin/bash web -c 'echo "export XDG_RUNTIME_DIR=/run/user/$(id -u);" > ~/.bashrc'
    # Enable the web and SSH servers
    su -s /bin/bash web -c '
      systemctl --user enable --now nginx.service;
      systemctl --user enable --now sshd.service;
    '
    # Sync changes and reboot
    sync
    systemctl reboot
Deploying the Server
Code
./vultrtl.sh deploy biscuits.conf biscuits.yaml
This will return a message along the lines of the following, with real values, where we’ve replaced them with ‘REDACTED’:
Code
{
  "instance": {
    "id": "REDACTED",
    "os": "Alma Linux 9 x64",
    "ram": 1024,
    "disk": 0,
    "main_ip": "0.0.0.0",
    "vcpu_count": 1,
    "region": "lhr",
    "plan": "vc2-1c-1gb",
    "date_created": "2025-04-24T17:43:11+00:00",
    "status": "pending",
    "allowed_bandwidth": 1,
    "netmask_v4": "",
    "gateway_v4": "0.0.0.0",
    "power_status": "running",
    "server_status": "none",
    "v6_network": "",
    "v6_main_ip": "",
    "v6_network_size": 0,
    "label": "biscuits",
    "internal_ip": "",
    "kvm": "",
    "hostname": "biscuits",
    "tag": "",
    "tags": [],
    "os_id": 1868,
    "app_id": 0,
    "image_id": "",
    "firewall_group_id": "",
    "features": [
      "auto_backups"
    ],
    "user_scheme": "root",
    "pending_charges": 0,
    "default_password": "REDACTED"
  }
}
We can check how far along the server is with its installation like so:
Code
./vultrtl.sh instances
Which tells us that it is still busy setting things up. Expect the whole process to take between 5 and 10 minutes.
Code
    {
      "id": "REDACTED",
      "os": "Alma Linux 9 x64",
      "ram": 1024,
      "disk": 25,
      "main_ip": "REDACTED",
      "vcpu_count": 1,
      "region": "lhr",
      "plan": "vc2-1c-1gb",
      "date_created": "2025-04-24T17:43:11+00:00",
      "status": "active",
      "allowed_bandwidth": 1,
      "netmask_v4": "255.255.254.0",
      "gateway_v4": "REDACTED",
      "power_status": "running",
      "server_status": "installingbooting",
      "v6_network": "REDACTED",
      "v6_main_ip": "REDACTED",
      "v6_network_size": 64,
      "label": "biscuits",
      "internal_ip": "",
      "kvm": "REDACTED",
      "hostname": "biscuits",
      "tag": "",
      "tags": [],
      "os_id": 1868,
      "app_id": 0,
      "image_id": "",
      "firewall_group_id": "",
      "features": [
        "auto_backups",
        "ipv6"
      ],
      "user_scheme": "root"
    }
Testing & Next Steps
Next we point our web browser to http://the-real-ipv4 address (‘main_ip’ in the feedback Vultr gives us) and witness the happy message: ‘Service Up and Running’.
We can test SSH like so:
Code
# The main server
ssh -i ~/.ssh/${SSH_KEY_NAME} -p 22222 webmin@the-real-ipv4 address

# The ssh container
ssh -i ~/.ssh/${SSH_KEY_NAME} -p 22223 root@the-real-ipv4 address
We can access the account like so:
Code
# The main server
ssh -i ~/.ssh/${SSH_KEY_NAME} -p 22222 webmin@the-real-ipv4 address

# Become root
sudo bash

# Become the 'web' account
cd /data/web
su -s /bin/bash web
Once we’ve done that we can request a certificate for our domain like so:
Code
# Temporarily disable the web server
systemctl --user stop nginx

# Request certificate
/usr/bin/podman run \
    --rm \
    --name certbot-initial \
    --volume ~/acme/etc:/etc/letsencrypt:Z \
    --volume ~/acme/lib:/var/lib/letsencrypt:Z \
    --volume ~/acme/www:/var/www/certbot:Z \
    docker.io/certbot/certbot:latest \
    certonly \
    --webroot -w /var/www/certbot \
    --non-interactive \
    --agree-tos \
    --email [email protected] \
    -d yourdomain.com -d www.yourdomain.com # Add all domains/subdomains

# Enable automatic renewal
systemctl --user enable --now certbot-renew.timer

# Restart the web server
systemctl --user start nginx
After this is done the server will renew certificates automatically, and restart the web server if there are any changes.
Once we have a certificate, we can register the new website by creating a file
for it (i.e. '/data/web/nginx/conf/conf.d/biscuits.com') like so, and have it in “Let’s Encrypt” mode:
Code
server {
    listen 443 ssl;
    listen [::]:443 ssl;
    http2 on; # Enable HTTP/2

    server_name biscuits.com www.biscuits.com;

    ssl_certificate /etc/letsencrypt/live/biscuits.com/fullchain.pem;
    ssl_certificate_key /etc/letsencrypt/live/biscuits.com/privkey.pem;

    include /etc/letsencrypt/options-ssl-nginx.conf;
    ssl_dhparam /etc/letsencrypt/ssl-dhparams.pem;

    resolver 1.1.1.1 valid=30s ipv6=off;
    resolver_timeout 5s;

    # Enable OCSP Stapling (relies on the resolver)
    ssl_stapling on;
    ssl_stapling_verify on;

    # Security Headers
    add_header Strict-Transport-Security "max-age=63072000; includeSubDomains; preload" always;
    add_header X-Frame-Options "SAMEORIGIN" always;
    add_header X-Content-Type-Options "nosniff" always;
    add_header Referrer-Policy "strict-origin-when-cross-origin" always;
    # add_header Content-Security-Policy "default-src 'self'; script-src 'self'; object-src 'none'; style-src 'self'; img-src 'self'; media-src 'self'; frame-src 'none'; font-src 'self'; connect-src 'self';" always; # Adjust CSP as needed.
    add_header Permissions-Policy "interest-cohort=()" always;

    access_log /var/log/nginx/biscuits.com.access.log;
    error_log /var/log/nginx/biscuits.com.error.log warn;

    root /var/www/biscuits.com;
    index index.html index.htm;

    error_page 404 /404.html;

    location = /404.html {
        internal;
        # log_not_found off;
        # access_log off;
    }

    location ~* \.(css|js|woff|woff2|ttf|eot|otf|svg|png|jpg|jpeg|gif|ico|webp)$ {
        add_header Access-Control-Allow-Origin "*" always;
        # Optional: Consider adding aggressive caching headers for static assets
        #add_header Cache-Control "public, max-age=31536000, immutable";

        # Try to serve the file directly
        try_files $uri =404; # Ensures Nginx serves the file if found

        # Optional: Turn off logging for static assets if desired
        # access_log off;
    }

    location / {
         try_files $uri $uri/ =404;
    }
}
After that we do a quick reboot of the web server and our site will be running in HTTPS mode:
Code
systemctl --user restart nginx
The Takeaway
There we have it dear reader, a fully functional web server, running in a rootless container. Ready to be populated with real websites, and Let’s Encrypt certificates.
We hope you enjoyed learning about how it’s done, and found some useful techniques for future use.
Yours,
Digerty
Categories:
- technology
- servers
- hosting